|
Link Use Cases with Screen Prototypes |

|

|

|
|
|
Link Use Cases with Screen Prototypes |

|

|

|
Link Use Cases with Screen Prototypes
Overview
TopTeam enables you to link Use Cases with Screen Prototypes. This allows you to link user interface specifications to the appropriate steps of the Use Case Flow-of-events and simulate the application.
After you have documented the Use Case Flow-of-events and also added the Screen Prototypes to the Repository, you can create links between the two to develop a more detailed specification.
Once you have linked User Interface Prototypes and Use Case Steps, you can:
| 1. | Generate Use Case specifications that automatically include linked Screen Prototypes in the output document. |
| 2. | Simulate the application for stakeholder review from the Flow Diagram tab. |
To link a Screen Prototype to a Use Case step, follow these steps:
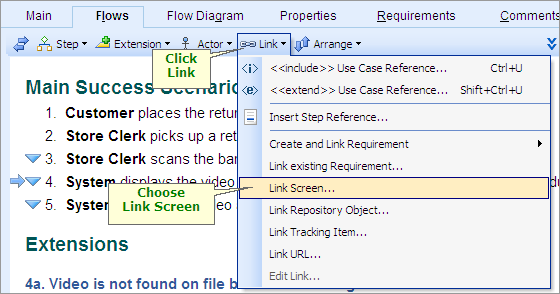
Open the Repository Explorer and select the Use Case that you want to edit. Use Case editor will appear on the right. Click within a step of the Flow-of-events that you wish to link to a Screen Prototype. (This makes that step the "current step" of the Flow-of-events. Click on the Link icon on the toolbar and choose Link Screen option.

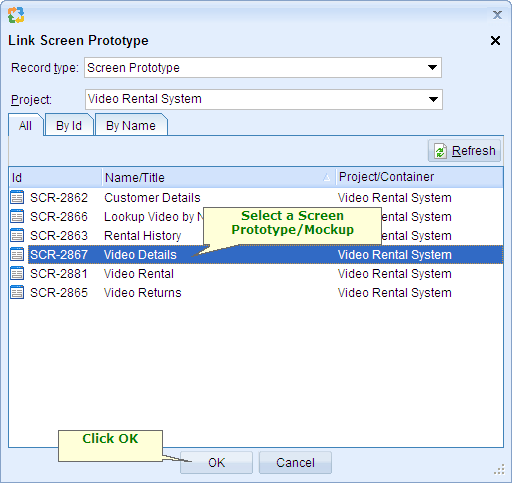
A list of Screen Prototypes in the current Project will be displayed. Select the appropriate Screen Prototype and click OK.

TopTeam will embed a link to the Screen Prototype at that location. Save the Use Case. TopTeam will automatically create a corresponding "Screen Prototype" -- used in --> "use case" Traceability link in the Repository.

NOTE
|
When you link a Screen Prototype to a Use Case step, TopTeam automatically creates a Trace link between the Screen Prototype and the Use Case. |
Step Complete
You have now successfully linked a Screen Prototype to a Use Case step.
Repeat these steps for all Screen Prototypes that you want to link to Use Cases and then proceed to the next step.